How to Make a Peppa Pig Cookie
HI I’m Robin, we’re here at cakes by Robin today and I’m going to show you how to make a Peppa Pig Cookie! We can make any characters, but we’ve chosen Peppa today because it is super popular.
We’ve printed off a picture of Peppa from the internet, you can choose any you like, and the good thing about this is that you can basically make any shape of cookie that you want. We’re going to trace around the picture of Peppa, because we’re going to be making a cardboard cut out.
With cookies you don’t want to make things have too much ‘pokey out bits’ so to speak because they’re quite easily breakable, so for Peppa’s legs we’ll just draw a little extra bit of the cookie, which we’ll then pipe her legs onto.
What we then do is we turn over the piece of paper, because we’re going to be tracing onto the cardboard. And if you just go over the lines again in exactly the same way. Once we’ve done that we’re going to cut it out, and there is your perfect Peppa pig cookie cutter made from cardboard.
So here’s some cookie dough, we use a vanilla shortbread. Its butter, mixed with sugar and then you add an egg, and flour and a little bit of vanilla extract and it makes a really delicious vanilla shortbread.
The key thing to remember once you’ve made it is that you need to chill is for at least half an hour, because it lets the dough rest and will stop the cookie spreading in the oven. I’m going to roll it out so that it is about 3cm thick.
 In terms of the dough, you want to make sure that it is even all over and you don’t want to have it so that bits are wider, fatter than others because otherwise they’ll take different times to cook in the oven.
So we take our Peppa cookie cutter/template and what we’re gonna do is just plonk it in the middle and then with a sharp knife, cut around it. Lift off your template and there you’ve basically got your Peppa. You just want to get any edges that are not perfect and just push them in.
So we’ve cut out the Peppas, we’ve cut out some more to fill up the baking tray. I’m going to just place them on here, not too close together because otherwise they may still spread. And then what we need to do is place them in the freezer for half an hour and again that prevents the spreading of them.
Then we’re going to place them in an oven at 180 degrees, for fifteen to twenty minutes. You want to probably just check at about fifteen minutes that they’re not going too brown at the edges.
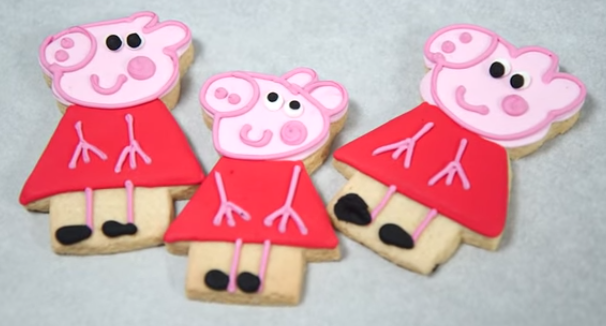
So now our Peppa Pig biscuits have come out of the oven, that’s a nice perfectly cooked biscuit. What we’re going to do is the outline of Peppa’s head and Peppa’s dress. Peppa’s head is pink, so we have a piping bag that is filled with royal icing, which is the icing that has got egg in it so that it sets hard like a meringue. This is basically making a barrier for the icing that we’re going to use that will be a bit more runny that will fill the centre of the cookie. And that’s the outline of Peppa!
So what we’re going to do now is take some royal icing, which is what we had in the piping bags, we’ve got two pots of it because we need the two colours, pink and red and what we’re going to do is add a little bit of the food colouring. You need very, very little food colouring to actually colour an amount of icing like that because it goes a really, really long way. And then I’m just going to colour up this one, do a little bit more of the red to make actual red.
With cookie making you don’t spread it on a cookie, you’ll never get a really professional look, what we do is we do what is called ‘letting down the icing’, which is where you add some water to make the icing a little bit runnier, using the outline we’ve created as a ‘barrier’.
So now we’re just filling up the red dress with the runnier icing, just going right to the edges, but not letting it overflow. And you want to fill it up a nice amount so that it looks like what is called the ‘cushion effect’ as it looks the nicest and most professional, if you put a lot of icing in.
So the last thing we’re going to do is put the details on Peppa. So we’ve left our Peppa biscuits to dry for about an hour, if you refer back to the picture, basically we are just going to go around the edge of Peppa again to give some nice definition to the cookie. This is the tricky bit but practice makes perfect on it.
And there we go, there is one Peppa Pig biscuit!